Friday, December 29, 2006

UFOs in the new year

UFO ~ in my world at least ~ stands for Un Finished Objects.

Sew, in the new year (2007) that is I am vowing to complete my current stack of UFOs.

1. T-shirt quilt (needs backing, since it it going on pillowcase style it shouldn't take too long, the hard part is pinning & cutting the fabric to size)

2. Back a scratchy blanket - have all items needed, also going to be done pillowcase style, again just complicated by it's size.

3. Seasonal towels - need more towels, fabric for Summer, Halloween, Fall, Patriotic & back to school, I should have enough buttons, but I'll have to do a final count before I finish them. I am making at least 5 sets.

4. Irish chain quilt, needs last row finished, bat, backed & bound I have all materials to finish.

5. Snowman wall hanging (finish applique, bat, back & bind)

6. uneven hem skirt (needs wait band set in & hem)

7. Waist band in dh's flannel pants

I'm sure there are more floating around down there!!! I'll post what I do, I promise!!!


Thursday, December 28, 2006

Sewing Notions Carrier

Ok, so I made one of these using a pattern from the fabric store I used to work in. The pattern was for a very elaborate satchel with zippers & lots of bells & whistles. But, since I was the lesser talent in the shop I came up with this carrier.

Materials:
1 place mat
10 sandwich size zip lock bags
1 length of ribbon (I used 1" wide), cut to width of place mat + 1" for turning under edges
scrap of elastic
scraps of fleece batting or heavy cut away stabilizer
button (or Velcro or snap)


Lay the place mat right side down. Place the zip lock bags in center, 5 facing left, 5 facing right, overlapping in the center the width of your ribbon. Press edges of ribbon under, then lay it over the center of the zip lock bags. Pin in place. Sew around the ribbon edges (I turn corners with ribbon down in fabric). Flip zip lock bags to right side.

The batting is going to create a booklet to hold needles. Cut batting into rectangles (I used heavy cut away stabilizer for mine) then stack them, trim to match edges. Pin into place in center of left place mat (still on wrong side). Sew down the center of the rectangles.

Flip the zip lock bags to the left side. The elastic is to make loops for scissors, cutters, or other larger objects. Pin elastic in center of right side of place mat. I have long scissors so I pinned it perpendicular to the zip lock bags. Tuck under edges & sew, creating as many loops as you need, making sure you sew both edges & that loops fit your equipment.

Then if you are lucky enough to have a machine that does automatic button holes, sew a hole to fit your button, attach button. The End!

If you aren't lucky enough to have a machine that does automatic button holes I suggest you add it to your 2007 Christmas wish list & use Velcro! That was what I did until I got my new machine (LOVE VELCRO!!!) I Velcro-ed everything!!!

Organizing the Sewing room

Sew, I spent some time down in the sewing room last night. Boy do I need some organizing & decluttering! Since I am a flygirl (www.flylady.net) I know you can't organize clutter, sew, I need to sort out as I straighten!

I have a couple of storage totes I am using for fabric right now, but they aren't clear. I need to acquire some clear totes.

My thread is mostly organized, at least the spools. I have a clear box that has 2 sides (looks like it would hold hot wheels or maybe tackle). The cones are another issue. I am considering a rack (wood dowel like thing) Sewing @ joann.com! search thread racks.

My Buttons are in a small tackle box, I think I bought at a yard sale...I can't remember I've had it a while.

My elastic & zippers are in plastic shoe boxes.

My current projects are in stackable plastic baskets (I got then at our D&K, but they are gone now, maybe the dollar store will have them...) I only have 3 & I'd like to have more. I go through periods where I just want to do my cutting all at once, but then I have no where to stick things separately.

I have oodles of fat quarters, fabric yardage, usable scraps that need homes. I have one flat underbed clear storage container, but only 1. I do have a couple of larger projects in the new XXL Ziploc bags.

I love storing my patterns in a file cabinet. I have file folders labeled with the pattern number, maker (KW2222 for a kwik sew, S9999 for a simplicity, etc), what it is (robe, pjs, dress) & size (2t-4t, 4-8, 16-20 etc). My problem now is that the file cabinet in my sewing room is legal sized, so I need new racks & file folders (my old file cab is staying in the office).

I made myself a portable sewing notion carrier. I'll post the pattern (or directions) later. Sew, all my markers, seam rippers, chalk, hand needles, etc are in there.

My new sewing room has a peg board wall (only part of a wall now, we will add more later) I have my rulers, scissors, rotary cutters, hot glue guns all on there.

I still need solutions for the craft "stuff" I have so many odds & ends that they are just dumped in a file drawer right now, not sure how I'll get that cleaned up!

Sew I have a great start, I just need to get the big stuff taken care of (guess I started too small!!!).

Tuesday, December 26, 2006

Holiday Light Show

Thanks to Tracey over at http://jinkies.clubmom.com/jinkies/2006/12/lightorama.html for the link to the light show! Me & the kiddos sat at the computer laughing hysterically over the winner!!!

http://www.lightorama.com/Videos.html

Hope Everyone had good Holidays!!!

Saturday, December 23, 2006

Holiday Pillow Case (or anyday pillow case)

I have made Christmas, Valentine's Day, St. Patrick's Day, Easter & every day so far for each kiddo. I am still planning on making a back up everyday, Halloween, Thanksgiving, Patriotic, Summer & Back to school.

Fabrics: (pair of cases)
This actually makes queen size cases, so they will either hang off the end of a twin pillow or you can upgrade to queen size pillow, I wouldn't recommend making them smaller since it really depends on the fluff of your pillow

1 1/2 Yard Cotton for the body
2/3 Yard Cotton for decorative hem
1/8 Yard Contrasting Cotton for accent strip

PRE WASH & SHRINK THE FABRIC

Cutting the Fabric:
Body: 27"x 41"
Hem: 11" x 41"
Accent: 2" x 41"

Creating the Case:
1. Using the 2" accent fabric, press in half lengthwise with wrong sides together. You will now have an accent piece 1" x 41".
2. Create a pile with raw edges matching, body fabric, right side up, accent fabric, and decorative hem fabric, right side down. Pin all the layers carefully making sure that you don't "lose" the accent fabric. Sew, using the edge of your presser foot for seam allowance, along the 41" raw edge. Set seam by pressing flat.
3. Roll up the body fabric, forming a tube, towards the hem edge.
4. Flip the hem fabric around the formed tube, so that raw edges are matching and right sides are together.
5. Pin edges & sew all layers using edge of presser foot for seam allowance. Be careful not to catch the rolled body fabric in the seam. My machine is digital & the needle is very easy to move, so I usually move the needle 2 clicks to the out side (right) of the previous seam just to be sure I don't go to the left of the stitches.
6. Pull rolled fabric out one edge. Press finished hem.
7. With wrong sides together and using a 1/4" seam allowance, sew the side & top edge of the body. Set seam by pressing flat. I usually find I have to do some trimming before I move on to the next step, you don't want any raw edges showing through your final seam.
8. Turn pillow case inside out, so that the right sides of fabric are on the inside. Press. Sew the side and top edge using a 1/2" seam allowance. Set seam by pressing flat.
9. Turn right side out. Press flat.

Last Minute Crunch

We spent today finishing up our shopping, mostly just an item for the in-laws & some stuff I needed from our local craft market since they close after today. I am glad we didn't put everything off until today! Our WalMart looked like a zoo.

I do however need to assemble some gifts, finish wrapping & last minute touches.........

Next year I will be more prepared. When I was working at the fabric shop we started a Christmas class, that once a month we would do a different gift project. So that is my plan this year. I am going to sew the sets of towels I have been working on (I had visions of holiday & seasonal sets given in a basket...I think I finished Valentine's Day, started St. Patrick's Day & cut Easter.) So I am going to be keeping my eye out for some holiday fabrics, our WalMart never got in any decent Christmas prints.

Sew, after I finish dinner, I am heading into the sewing room to see what else I need to finish up.

I am going to have to search for my pillow case pattern. I'll post it later

Wednesday, December 20, 2006

my conflicted self!

I posted my rant this morning over at http://thefrugalmomma.blogspot.com/. My frugal self & my creative self have collided again!!!

I will admit that the creative self usually wins, so on with the projects!!!

I finished the remote control armchair caddy. I will have a pic after Christmas, I wrapped it before I thought to snap a shot.

So today I will be finishing the reversible jacket for the Princess, sewing the other blocks for the grape table runner (http://www.quiltinaday.com/shoponline/books_display.asp?i=673), and hopefully cutting the pieces to make Mom's kitchen aid cozy. I found a pattern online (I am going to make a mock up first just to try it on, make sure it fits before I sew up with the last of the expensive fabric.) http://sewing.about.com/library/weekly/aa011801b.htm?terms=mixer+cover

It's crunch time now, I have almost completed all of my shopping, so now I am working on the food. Since it's my birthday (Sunday, but we aren't talking about it.) I make the cake for our Christmas Eve family gathering. So, this year I am making a pineapple upside down cake & an angel lush cake (http://www.kraftfoods.com/main.aspx?s=recipe&m=recipe/knet_recipe_display&u1=keyword&u2=angel%20lush%20cake&u3=**2*2&wf=9&recipe_id=51103)

I am also bringing some frozen drinks I got at Target & mixed up so they could freeze. I checked on them today & they weren't ready yet, so I'm glad I prepped them in advance. Of course I knew that a full 1.5L of vodka would end up in cranberry juice if just left alone.

I still need to get my behind in the kitchen to make some more cookies (PB Blossoms & butter spritz cookies, probably won't get much more than that done.)

Monday, December 18, 2006

Sweater Mittens, sweater pillows

Ok so searching for a quick homemade gift the kiddos can make led me to http://jas.familyfun.go.com/arts-and-crafts?page=CraftDisplay&craftid=10004

I am thinking I'll give this a whirl. Only I don't have any wool sweaters & I didn't like the stitching outside. Sew basically I'm not doing the pattern at all! I figure I'll trace my hand, add a bit, line up the pattern at the bottom of the hem or a cuff maybe, cut it out. Then with right sides together I'll sew it on my machine (or maybe the serger...). I'll have to let ya know how it works out.

Sweater Pillows

I have made a few or these. I gave some to my sister as Christmas gifts one year. I still have one or two to sew up for her, she gave me the sweaters this time.

Decide on the size of the pillow, add at least 1" for seams (1/2" each side so 12" pillow + 1" = 13" square), cut out 2 squares to size. I love my square ruler & rotary cutter for this! Then right sides together sew around the square, leaving a big enough hole to turn right side out & stuff (bigger if using a form, smaller if stuffing by hand) Then after it's satisfactorily stuffed hand sew (or machine top stitch) the hole closed. Voila! One very cuddley pillow!!!

btw visit http://myfavoritepowerballads.blogspot.com to see what I'm listening to as I sew!!!

Sunday, December 17, 2006

Today's Project

http://www.pfaffusa.com/721_5103.html

Armchair Remote Holder

I am going to make this for my Dad. It's going to be out of the twill camoflauge fabric! I figured I should be able to whip it up today & be done with it. And since I don't have an embroidery machine (~sniffle, sob, sniffle~) I won't have to do that...

I do just love how you have to have "their" sewing machine!!! Because I can't do the project with out it! They all do it, some even tell you you need a specific machine! It's just too funny! Especially when it is something that is mostly straight stitch!!!

Saturday, December 16, 2006

No Sew...Kids craft day

http://www.marthastewart.com/page.jhtml;jsessionid=Z2VFHZ5FWCDPJWCKUU2SJBWYJKSS0JO0?type=content&id=channel181245&navLevel=2&site=kids

We are going to make snowflakes today. Found the craft at above link, but the ides came from http://kiddley.com. I think it will be fun for the kids & last nights weather said they are predicting we won't have a white Christmas (oh darn!). Sorry, but when you live on Lake Erie, the green Christmas is a luxury!

I am also trying to come up with a quick & easy sewing creation to make for my Dad. I have yards of camoflauge fabric, but it's a twill, so boxers are out. hmmm, this may take a while & some serious surfing!!! He is a hunter, gun dealer, school bus driver & has EVERYTHING!!! I drew his name & all he wanted was underwear & socks...

I am also planning on making a batch of Italian Chocolate Cookies & Butter Spritz. The Prince loves to use the cookie press, so I imagine I'll be making green trees & pink wreaths!

Friday, December 15, 2006

Easy Christmas Stocking Completed!!!


Woohoo. Another project moved to the completed side of the board! The Prince needed a new Christmas Stocking, didn't think a 7 year old should still have a Bear in the Big Blue House one. Sew.... I used two of dh's old jean shorts & a pair of flannel pj bottoms, cut 6 1/2" squares out.


I pieced them together in Chain Fashion, one row at a time. I made 5 rows of 7 squares, used my 1/4" hem foot. When I sewed the rows together I pinned at the block seams to line up the pattern & pressed in between sewing & pinning each row.


Then I folded the fabric in half & (thankfully I had a pattern) I traced a stocking we had using chalk. I cut out the outline, pinned right sides together (again lining up the squares as best I could) & sewed another 1/4" seam around the stocking. I reinforced the bottom by stitching it twice from heel to top of foot. I pressed it, turned it right side out, turned the upper boot under almost 2" (this is where you could add another piece of fabric (fur, contrast...). I choose to just turn it under so the unfinished inside wouldn't show. I made a loop out of some tulle I had, didn't have a good matching ribbon. I pinned the loop at the "back" then topstitched the hem & loop into place about 1/2" from the upper edge.


Sew all in all I think that with cutting the squares, sewing them into fabric & cutting & sewing the stocking took about 2 hours total.


Wednesday, December 13, 2006

I finally finished one...UFO that is...


Ok so after a shopping trip finally revealed you can still buy plain clothing in the USA, I have managed to finish the Princess' casual holiday outfit.


I found the ribbon at Michael's (it is holiday ribbon, but it is also simple white dots on red ribbon, should work for Valentine's too!) I found the idea online, I didn't follow any pattern or suggestion I just used my shiny embroidery thread on top & regular white in the bobbin & sewed the ribbon into place. I did tuck the ends so the raw edges aren't showing, The bows are just loops I sewed together then sewed down where I wanted them.


Quick & Easy gift I have been meaning to try...

I have been meaning to do this project since I first found it. I am not sure if I haven't found the right towels yet, or if I just have too many UFOs floating around to start another big undertaking...

Head Wrap
Supplies:

One bath towel (the thinner, the better) at least 24" wide and 35" between the woven bands at each end

6" length of 3/8"elastic

sewing thread to match towel


Fold the towel in half lengthwise, right sides together. The fold is at the top.


To make a pattern lay down pattern paper or fabric in between the insets of your towel. Measure 12-13" up on left (to create the back) then 12" towards the right along fold. Then measure 36" (or less depending on your towel) along the finished edge over from the left (back) line. Measure up 3 1/2", then connect the top of the 3 1/2" line to the 12" line at the fold.


If your towel is only 24" or 25" wide, do not cut along the fold at the widest part of the Head Wrap. Use the fold instead of making a seam there.

Cut out your towel using your pattern, if you don't want to use a pattern I'd draw a chalk line of where I wanted to cut. Cut along your lines. keep right sides together.
Fold elastic in half. On the back seam (12-13") measure up 3-1/2"from the finished edges and pin the elastic between the layers, with the cut ends of the elastic extending 1/4" beyond the seam allowance. Sew a 3/8" seam all along the cut edge (tapering into and out of the fold if your towel is narrow). Serge or over edge stitch the seam. Reinforce the seam at the elastic.
Turn the towel right side out. The elastic loop should stick out at the back seam.
To use the Head Wrap, lean forward so that your hair falls in front of your face.Place the back seam of the Head Wrap at the back of your head and allow the rest of the Head Wrap to fall forward over your hair. Twist the narrow end of the towel (with your hair inside), then tuck the twisted end into the elastic loop.

If you wish to embellish the towel, put it on your head as described above and mark where your ear is.
This is where you can embroider. Select a design that is fairly open so you will not have something hard against your ear.
You could do allover decorative stitching, monogram... Possibilities are endless

Monday, December 11, 2006

Virtual Cookie Exchange

I just made these for our first Christmas party of the season. They are yummy (more brownie like than cookie), but tend to dry out easy, so if you want them moist keep them sealed in a zip lock bag.


CHOCOLATE CRINKLE COOKIES
1 1/2 c. sugar
1/2 c. oil
6 tbsp. cocoa
2 tsp. vanilla
3 eggs
1/4 c. milk
2 c. flour
2 tsp. baking powder
Powdered sugar

Combine sugar, oil, cocoa and vanilla. Beat in eggs, one at a time.Stir in milk; add flour and baking powder. Chill dough 2 hours. Using1 teaspoonful for each ball, roll in powdered sugar. Place on greasedcookie sheet. Bake at 375 degrees for 10 minutes. While warm, rollagain in powdered sugar. Makes four dozen.

Friday, December 8, 2006

Almost No sew Tutu...

DD is going to love this! I wish I had a picture right now to post! All I did was sew a piece of elastic to make a waist band (I overlapped the ends & sewed it so it was flat) & then using a slip knot I tied a bunch of pieces of tulle ribbon on to the band.

I know I said almost no sew... don't have the elastic or sewing machine, you can recycle the waist band off a pair of pants that are too short. I'd try to match color to the tulle, but it doesn't matter. Princess is only 3...

I added a few pieces of ribbon slip knoted as well. I used what I had so I had yellow ribbon (the satin kind you can find for $0.44 a roll.) I picked up the roll of tulle ribbon at Michael's the last time I was there. It is fantastic 5" roll of pink tulle! I cut some of the pieces in half length ways so some were 2 1/2" wide. So I alternated the wide strips with the narrow strips. You could use multiple colors for a striped effect....

I cut my pieces to 26" long, figured the skirt would be 12" long + enough to do the knot. I have seen these with more ribbon than I used, silk flowers, ballarina buttons sewn on to the tulle....

The possibilities are almost limitless here!

If you wanted it to tie on instead of pull on just use a long piece of ribbon (I'd go atleast 2x waist size+ a couple inches so the ties would hang down), tie the tulle on. I would knot the ribbon at the end of the tulle just so the slip knots don't slide off.

The bonus...I still have some of the tulle leftover. Maybe I'll make some bows for her hair!

Virtual Cookie Exchange Dec 11th - Link

http://jennsjournal.clubmom.com/jennsjournal/2006/12/first_annual_vi.html

Thursday, December 7, 2006

Snowy Day...

We are getting a shot of Lake effect snow today. I suppose it's to be expected, after all it is December! It has just been so enjoyable to have had the delay in winter weather here. Just a couple weeks ago we were putting another coat of paint on our front porch!

I found some great links this AM! I can't remember if I'd ever heard of this one before, or if this was a first http://www.etsy.com/index.php it is for selling all things handmade or supplies! I found the link from http://sewgreenblog.blogspot.com/ THANKS!!! There were a bunch of things I already have my eye on. This looks like a great resource for ideas & supporting other crafters whose skill is beyond mine, or in areas I know nothing about!

One book that's going on my Christmas wish list is Fashion Sweatshirts. I love the idea of buying an unfabulous sweatshirt & then turning it into something fabulous! I have made one for the little Princess, however she has since outgrown it! All I did was add fake fur to the collar, cuffs & waist. So I am looking for some more inspiration... Of course I need another 3 projects...

Tonight I am walking, since I didn't last night (our school opens up to walkers in the evening as part of a wellness program). I also need to squeeze in some time in the sewing room. I have the reversable jacket to sew, one more bandana skirt, one ballarina skirt to figure out, a table runner to finish, quilt & bind, a snowman wall hanging to satin stitch, quilt & bind, 3 childrens aprons to sew, I should go & figure out something quick to make for Grandma & my God Mother...

Sew what am I doing sitting here! Off to the sewing room, wish I had a "Do Not Disturb" Sign!

Tuesday, December 5, 2006

Bandana Skirt revisited

I finally made my first! Instead of attaching to a shirt or creating a casing for elastic I recycled an elastic waist band from a pair of flannel jammies. I trimmed it off the pants just below the elastic & cut it to the right length. I pinned it onto the bandana dividing by sections (1/2, then 1/2 of the half, etc...). I used my serger for a nice finished seam. The poof is fantastic!

I think when I make the next one I am going to sew it onto a shirt to make a dress. The little princess loves it!

Day 5...Pocket Tissue Dispenser

I made these last year for small gifts for the women in my life. I used Christmas fabric & included a pack of tissues!

Fabric

3 pieces cut 3 1/2" x 6"

INSTRUCTIONS
Fold two pieces in half lengthwise press with a hot iron.
Lay on top of the right side of the third piece overlapping in the center and pin. Folded edges should face the center.
Stitch around entire outer edge in 1/4" seam.
Trim corners careful not to get too close to stitching.
Turn right side out and press, gently pushing out corners.
Cut out, press & pin several at a time just line them up and away you go.

If you have embroidery you could use a plain fabric for the bottom, monogram, design, whatever you can imagine!

Monday, December 4, 2006

Poem to go with rice pillow

This little pillow filled with rice,
Was made with love as a comforting device.
Microwave for 2 to 3 minutes on High,
and kiss those aches and pains goodbye.
Apply it to the troubled spot,
The heat will ease the pain a lot.
Or warm those little toes, so cold
You'll find this nice to have and to hold.
And fix that boo-boo up in style
thinking of me all the while.
Instead of a compress made of ice,
Use this pillow filled with rice.

Day 4...The versitiale Rice Pillow

I have made these in every imaginable size & shape. They can be hot or cold. They can be square, round, rectangular or the odd sock.

I have 4 of these in the house that I made just for us last year. Two are made out of cheap dollar store Men's tube socks. These are great for neck aches, cramps, headaches, etc. I also made 2 we called boo boo bags for my kids, they are about 4" square (I cut 5" squares & used 1/2" seams). They are the perfect size for toothaches, small boo boos & when not medically necessary they are great bean bags!

I use plain old white rice. I found some lavendar & put a few tablespoons in with the rice. It gives a wonderful aroma.

I made them as gifts. Why not. Ds's teacher last year loved hers.

I will be sewing up a couple more this year. The square pillow kind. You can use any cotton fabric, just cut it to the size you want. Sew wrong sides together, leaving a hole for turning & filling. Turn it right side out, use a funnel to fill with rice, I prefer halfway to 2/3 full. This will leave some room for mushing & bending. Then you can hand sew the hole closed or if you are like me & don't care machine stitch it closed (most people wouldn't even notice the difference, unless they sew!).

Microwave times will vary by size, but I have found that 2 minutes is a good place to start. Probably too long for my 4" squares, & not long enough for the tube socks, so experiment.

Enjoy the season!

Sunday, December 3, 2006

Day 3...sewing gift for the guy who has almost everything...

http://www.berninausa.com/media/knowledgebase/projects/pdf/prj0048_2efd.pdf

I found this project last year. I haven't attempted it yet, but I do have some extra canvas laying around (ok like most of a bolt left, but I have plans for it!) I bought the canvas to sew shot gun covers for my Dad, but I have used it for art aprons, a toy organizer & who knows what else will come out of it.

I think this might be nice in denim too. I save all the jeans we outgrow or ruin to wear, or I buy at yard sales, they are a wealth of fabric! I am collecting pockets to create an organizer for dd's room. I have recycled more than one pair of dh's old jeans into jumpers for dd.

Saturday, December 2, 2006

Day 2...

I was shopping last night & picked up 2 different kinds of bandanas to make 2 of these for my little Princess. I found one really great holiday print & one regular print. I'll post pictures when they are complete!

I also picked up some fleece batting so I can finish the table runner I am making for my MIL. So hopefully I'll get to spend a little time in the sewing room today! I have been busy setting up our office, dh & I share the space & we both work from home (he does 3rd shift customer service & I just started a candle party business). Sew we have tons of stuff to sort through. Especially since up till 2 months ago this room was also my sewing/craft room... Well, anyways I've spent the last 2 days tossing junk mail & setting up files for my business & not sewing a thing! The plan for the day is to spend a little bit in the office, do some laundry & then get to sewing this afternoon!

From http://sew-whats-new.com/CMS/index.php

Make Your Own Bandana Dress/Skirt

This dress or skirt fits any toddler. It sounds easy enough that you could make several for that special little girl.

First, take two bandanas (I bought some from Michael’s) and place them one on top of the other and line them up as best you can.

Then you will fold them on the diagonal, and then fold on the diagonal again. You should have a small triangle.

After that calculate the waist size. I take half of Clara’s waist, then divide that by two. Once I have that number, I follow down the top point of the bandanas (the folded point) until I reach that number on the measurement across. Once there, I cut across the pointed portions in a semi circle.

(Of course this time, I cut too straight and made it somewhat square. If you also do this, just trim it out once it is opened for the waist of the dress, or the elastic of the waistband).

Open the bandanas and you will have a circle in the center.

Turn one of the bandanas caddiecorner to the other and you will have 8 points for the skirt.

At this point, you can attach it to a shirt and finish the seam, or hem the waist and make a casing for elastic (follow other directions for twirl skirt). Since I use store bought bandanas, I do not do any other hemming.

When attaching to the tank, I do stretch the shirt out to match the hole in the bandana to get a nice ruffle effect.

This information was generously supplied by Janet, a member of our site.

Friday, December 1, 2006


A QUILLOW FOR YOU

Use me as a pillow

Unless you get cold

Then pull out my stuffing

And gently unfold

I am a lap quilt now

With space for your feet

And when you are all done

Fold me back nice and neat


Folding

Place the quillow on a flat surface with the pillow pocket on the bottom.

Fold the quilt into thirds the long way by lapping the outside edges one over the other.

Pull the bottom of the pillow pocket up and over the lapped folds so that you turn the pillow

Pocket "inside out" over the body of the quilt.

Fold the quillow into thirds lengthwise.

Grasp the second fold the one furthest from the pillow and stuff it into the inside pocket as far as it will go.

Smooth out the lumps and wrinkles.


Happy December 1st!

Sew the countdown begins!!! If you don't celebrate Christmas, forgive me, there are plenty of other holidays this time of year to celebrate as well! Sew no matter what your beliefs are we all seem to have huge lists of things to get done in December!!! I know that if it was any normal month we'd still be busy with 3 family birthdays this month. Coming off November where we have 5 birthdays & 2 anniversaries one barely has time to think!!!
I keep telling myself that I will start earlier in the year, and really I did try this year. Guess I just got sidetracked. And forget accomplishing anything over the summer, we operated 2 ice cream shoppes this year, one with full food service, I'm lucky I was able to keep up with laundry let alone sewing for the holidays.

Sew I figured I'd share the details of the fleece quillows I mentioned yesterday, since it's a cozy & easy gift idea! I finished 3 of these in a few hours, plus made scarves out of the leftovers (just trimmed the edges with my pinked rotary cutter & a 2" fringe on ends with the straight rotary cutter).


Fleece Quillow


What is a Quillow? A 
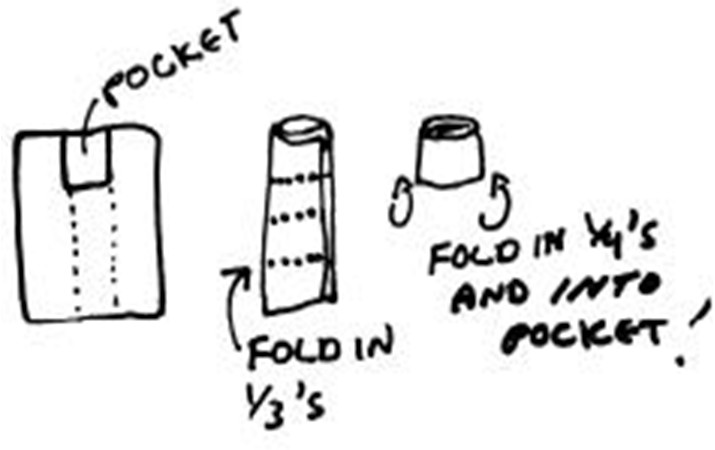
quillow is a blanket (or
quilt –hence the name) with a built in pocket. The blanket
folds up into the pocket –creating a pillow. This simple
quillow is made of fleece.
Any blanket or quilt can be made into a quillow by
attaching a pocket with a finished width 1/3 of the width
of the blanket plus 1 to 2 inches and a length of about ¼
of the blanket plus 1 to 2 inches.


Fabric


1. For a 48” by 60” lap quilt: buy 1 7/8 yards of 60” width fleece. (This will leave you left over
fleece for 2 more pillow pockets. –OR- Use an 18” square scrap of fleece for the pocket and
1 and 1/3 yards fleece for the blanket. *You can even piece your little polar fleece scraps to
make a pocket the right size.
2. Larger blankets: If you have access to wider fleece –you can make a longer blanket. For
example, if your fleece is 70” wide, to make a 54” by 70” wide fleece blanket, just make
your pocket 20” long.

If your fleece is 60” wide but you want a bigger blanket, buy more yardage. For a 60”by 72”
quillow, for the blanket portion buy 2 yards of fleece. Your pillow should be 21 to 22”
square.

Supplies:

1. 90/14 Universal sewing machine needle
2. Good quality polyester thread –we like Mettler’s Metrosene.
3. Sewing machine in good working order.
4. (Optional) Rotary Cutter and Mat
5. (Optional) Wavy blade (or you could opt to do a fringe trim)

Sewing Machine Directions for the 48” by 60” quillow:

1. Cut the blanket to measure 48” by 60” (4’ by 5’). –For a fun
treatment, use a wavy blade rotary cutter.
2. Cut an 18” square for the pocket. –Again, use your wavy blade.
3. Mark the center of the short side of your blanket and of your
pocket. –place pocket along blanket short side (48” side) right
sides together–matching center marks. If using the wavy blade
>just pin down and sew around 3 sides of the quillow leaving
interior bottom side open. OR turn under a ½” hem and sew
down from the top. To sew use a narrow zigzag or your stretch
stitch (looks like a narrow zigzag.)


©December 2000 Alexandra Wright* Thread Dreams * for Hans’ Sewing & Vacuum
www.sewvac1.com May be shared freely with attribution.

Thursday, November 30, 2006

My first posting...


With Christmas just around the corner (sooner for those of us that are celebrating early) I figure I need to find some quick & easy projects I can get done for the large list I always seem to have!

One project I have found fun & easy to do is fleece scarves. One year I lucked out & bought a ton of fleece on sale, made my nieces quillows & matching scarves. I didn't have my serger at the time, but I had my rotary pinker, cutting mat & ruller! Everything came out great & the girls still use them.

This year I found a fleece project for a "Twist Boa" This boa is fast to make - fold, stitch, cut and twist.


Materials: makes 3
• 1 2/3 yds. outerwear fleece
• matching thread
• marking pencil, chalk
• OPTIONAL: rotary cutter, mat, ruler
Cut:
• (3) 18" X 60" pieces fleece
NOTE: 60" length is parallel to selvage edge
and 18" is greatest degree of stretch.
Directions: for each Boa
1. Using a marking pencil, mark a line 6" from each long edge on the wrong side.
2. Bring top line down to meet the other, folding fleece wrong sides together.
3. Bring raw edge to fold, making a second fold over the first.
4. Using a wide, medium length zigzag, stitch over fold and raw edge from steps 2 and 3.
5. Wrong sides together, fold fleece so remaining long raw edge just covers stitching from step 4. Zigzag over this edge through all layers.
6. On each section, make 3/4" wide cuts about 21/2" deep forming loops. NOTE: Cuts should end approximately 1/8" - 1/4" from stitching.
7. Twist the end of each loop to bring the inside to the outside. Taking care not to stretch loops too much.